Range-Bound Trading: How to Profit From Horizontal Markets
Most forex pairs spend significant time in sideways, range-bound conditions. Learn to identify valid ranges, place entries at range boundaries, and manage trades within the defined price corridor.
Markets don’t trend all the time. Empirical research consistently shows that most financial markets spend 60–70% of their time in range-bound conditions — oscillating between support and resistance without establishing clear directional momentum. Traders who only have trend-following systems either sit on their hands most of the time or try to apply trend strategies to ranges, which generates consistent losses.
Range-bound trading is a separate skill set that generates returns during the periods when trend strategies go silent.
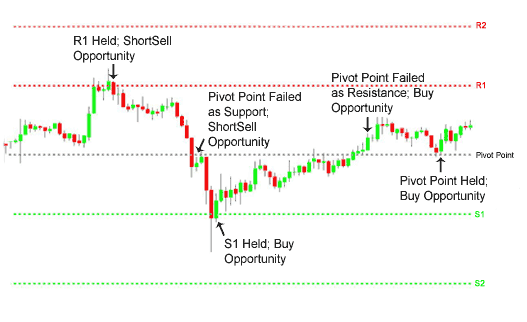
What Makes a Valid Range?
Not every period of indecision qualifies as a tradeable range. A valid range requires:
1. Defined horizontal boundaries: A clear ceiling (resistance) and clear floor (support) that price has tested at least twice each.
2. Multiple bounces: Price has respected the boundaries multiple times — touching resistance and reversing lower, touching support and reversing higher — establishing the range as a real oscillation rather than a consolidation before continuation.
3. Reasonable width: The distance between support and resistance must accommodate an acceptable risk-reward ratio. A range of 40 pips with a 20-pip stop (because the boundaries require it) leaves no room for a 1:2 RR target.
Minimum practical range width for major pairs:
- EUR/USD: 60+ pips (support to resistance)
- GBP/USD: 80+ pips
- USD/JPY: 60+ pips
4. ADX confirmation: ADX (14) below 20 confirms the market lacks directional trend. ADX rising above 25 while price is in the range signals an emerging trend — the range may be ending.
Identifying the Boundaries
Resistance: The horizontal price area where price has reversed lower multiple times. Mark the zone from the highest wick to the most recent significant close at or near the ceiling. Use a rectangle, not a single line.
Support: The horizontal price area where price has reversed higher multiple times. Mark from the lowest wick to the most recent significant close at or near the floor.
Why zones, not lines: Price rarely reverses at exactly the same pip level each time. A zone of 15–30 pips (wider for daily charts) more accurately represents the area of concentrated order flow.
Range Trading Setups
Setup 1: Bounce from Range Boundary
The primary range trade — entering when price touches a boundary and shows rejection:
| Step | Action (Long at Support) |
|---|---|
| 1. Confirm range | ADX below 20; clear horizontal S/R boundaries; 2+ tests of each |
| 2. Wait | Price declines toward the support boundary |
| 3. Touch | Price enters the support zone (±15 pips of the boundary) |
| 4. Rejection | Bullish rejection candle: hammer, bullish engulfing, or pin bar |
| 5. Entry | Long at next candle open |
| 6. Stop-loss | 15–20 pips below the support zone |
| 7. Take-profit | Resistance boundary minus 15 pips (leave room before the ceiling) |
For short at resistance: mirror conditions with bearish rejection candle.
The “take-profit minus 15 pips” rule: Don’t target the exact resistance level — other range traders and algorithmic systems will be selling there, making it likely price will reverse slightly before reaching the exact resistance. Take profit at the midpoint or slightly before the opposite boundary.
Setup 2: Range Midpoint Re-Entry
After a strong push from support, price often pauses near the midpoint before continuing. Alternatively, it may pull back to the midpoint before resuming toward resistance:
- After a long entry at support, if price pulls back to the midpoint of the range with a rejection candle, it’s a valid second entry in the same direction
- Risk is smaller (stop below the midpoint pull-back low); target is resistance
Setup 3: Failed Range Breakout Re-Entry
When price breaks outside the range but quickly fails and returns inside:
- Price closes a candle outside the resistance level (false breakout upward)
- Next candle closes back inside the range
- Short entry: price is now inside the range with trapped buyers above
- Stop: above the false breakout high; target: support zone
This is the “range continuation after failed breakout” and is often the most powerful move within a range — the stop hunt that traps breakout traders.
Risk Management for Range Trading
| Parameter | Recommendation |
|---|---|
| Risk per trade | 1% of account |
| Stop-loss | Beyond the range boundary (15–20 pip buffer outside the zone) |
| Take-profit | Near-opposite boundary (15 pips before reaching it) |
| Maximum trades per range | 2–3 in the same direction before reassessing |
| Exit if range breaks | If price closes a full candle beyond the boundary, close range trades |
The breakout exit rule is critical: When price closes significantly beyond the range boundary (not just a wick), the range has ended. Exit all range positions immediately — the move may become a trending breakout and continuing to hold range trades becomes a counter-trend position.
When Ranges End: Transition to Trend
Ranges end when:
- Price closes multiple consecutive candles beyond one boundary
- ADX rises from below 20 toward 25+ while price is making directional progress
- A significant fundamental catalyst (central bank decision, major data release) produces a sustained directional move
When you see these signals, shift from range strategies to trend-following strategies. The highest-probability trade at a range breakout is often a breakout continuation entry — see Breakout Trades With Pivot Points.
Key Takeaways
- A valid tradeable range requires: 2+ tests of each boundary, ADX below 20, defined horizontal boundaries (mark as zones, not lines), and sufficient width for an acceptable RR
- Primary setup: bounce from range boundary with rejection candle; take-profit 15 pips before the opposite boundary (not at it)
- Failed breakout re-entry is often the strongest move within a range — trapped breakout traders provide momentum when their stops are triggered
- Risk management: stop beyond the boundary (outside the zone); exit immediately if price closes a full candle beyond the range boundary
- Most markets are range-bound 60–70% of the time — having a range strategy alongside a trend strategy provides consistent opportunities regardless of market conditions
- When ADX rises toward 25 or price closes convincingly beyond the boundary, shift immediately from range to trend strategies
Related strategies: Support and Resistance Without Indicators | Breakout Trades With Pivot Points
Related lessons: Support and Resistance Levels
Tools: Position Size Calculator

Ready to Practice This Strategy?
Test what you learned on a free, risk-free demo account before risking real money.